Rhino 3D TIPS AND TRICKS
Hopefully, The tips and Tricks on this page will assist those who desire
to modify Lara's meshes for use in the Level Editor.
In stead of rambling on about how to, I will again try to use screenshots
to help.
Rhino offers many, many tools and features, of which we will only be using
a few. Once you get the hang of the program , you can experiment with
the other features on your own.
Of course, the first required tool will be a copy of Rhino 3D. Also, you
will need to have a current version of STRPIX, TRLE, and a paint program.
TRWEST is also very handy!
It may prove beneficial, to look through the tutorial that comes with
rhino, in order to become a little familiar with some of it's features.
At the very least, maybe try building a few simple boxes and shapes.
For the first part of this project, we will be modifying Lara's Torso
mesh. First, we need to get organized.
Secure a copy of theTR2 Wetsuit from "Lara's
Wardrobe " and un-zip it. This will give you a folder named Wetsuit
with a modified coastal.wad file within. In this folder, create three
folders; named meshes, original wad, and textures.
Within the "textures" folder, create folders named "Tank" and "Torso"
Go to your Trle/graphics/wads folder and find the newcity.wad and copy
it to your new "original wads" folder
NOW WE BEGIN!
Start up STRPIX and open the newcity.wad and scroll through the list of
meshes until you find the Nitrous Oxide Cannister (mesh #246) and export
it to your "meshes" folder (save as mesh #246). Also, export the pipe
mesh (mesh #240) so we can use it later.
Now open the Coastal.wad containing the wetsuit and scroll through the
meshes until you find Lara's Torso mesh (Mesh #24) and export it to your
"meshes" folder.
Locate the textures for Lara's backpack and texture #223 and save them
to your "/textures/torso" folder.
We may not need all of the pack textures, but it's easier to find them
now. We will be using these texture squares to re-color Lara's back later.
Minimize STRPIX and open Rhino 3D.
RHINO 3D FAMILIARIZATION:
It should look this after you open the extracted mesh of Lara's Torso
(mesh #24).
First, we'll have to lose the backpack. To do this, simply left click
on the various parts of the pack and delete them.
You will often get the small window, asking if this is the item you intend
to click on.

NOTICE the yellow highlighted triangle on Lara's pack.
Continue to delete until your mesh looks like this!
If you click the perspective window and then shade,
you will see a shaded view of this mesh that you can rotate

Your shading may be different. This is set to my preferences.
Now we start re-building her back to be more natural. Start with one side
and highlight the polygons that are along the left side and turn on their
control points.
HINT: if you pass your mouse over each button, they will 'explain' what
each does.
Now we begin building, first we'll snap an existing polygon to a new shape.
Refer to the picture below for the first snap and how to turn on the 'Point
Snap' Feature!
Repeat the same for the other side.
Locate the tools option in the top menu bar and click it, scroll down
till you locate 'Polygon Primitives' and select '3D face'.
You'll snap your new polygon in a COUNTER-CLOCWISE
direction in order for the 'face' of it to be facing out!
NOTE: To make triangles, you'll have to press ENTER after the third point.
The default setting for 'polygon primitives' are for squares.
Once you've repeated this for the other side, it should look like this!
Now simply close up the remaining opening in the same way until it looks
like this!
Now save this mesh as mesh #24a in your "meshes" folder.
Congratulations, you have just made your first modified mesh!
This could be re-imported with STRPIX, re-textured and used in the game
as Lara without her pack.
BUT....
We aren't stopping here.
Now for the scuba tank!
With Lara's modified mesh still open in Rhino, find the file button in
the top toolbar and scroll down until you locate 'IMPORT/MERGE"
in the menu and click it. Open the Nitrous bottle (Mesh #246).
When it opens in your mesh, it will be right on top of your mesh, and
it'll be too big, and will throw Lara's "Balance" off. It will have to
be resized.
NOTE: I tried this procedure with two tanks, but unless they are
very small, they disrupt the meshes too much and you get the "Weird protrusions"
Often referred to as the "Pony Tail Problem".
While holding down the Alt button, Press the left arrow key about eight
or ten times to 'Nudge' the tank to the side like this!
Now locate the SCALE option in the top tool bar and scroll down to 'SCALE
'and select 'SCALE 3D' from the menu. Place the crosshair at a point on
the top of the tank and left click. 'Make' a straight line to the bottom
of it and click again.
Now move the mouse up and watch as the tank shrinks. The size you reduce
it to is your own personal preference,
Mine looks like this!
Now we have to move the assembled tank into place on Lara's back. To do
this, you'll need to box in the tank so that it's highlighted and nudge
or drag it into place. To box it in, hold the left mouse button down and
draw a square around it. I also flipped and rotated mine slightly for
a neater fit, and to put the nozzle facing out.
Now we're ready to have a look at in STRPIX. Save the mesh you've been
working on as Mesh #24b as a .dxf file.
Make sure the save options box looks like this!
Now, re-open or maximize STRPIX and go back to Lara's Torso mesh (#24).
Select import .dxf from file menu and click your new mesh (#24b) have
a look.
Here's mine
At this time, you can inspect your work carefully and see if all your
polygon faces are facing in the right direction. If not, simply go back
into Rhino, re-do them in a counter-clockwise direction and re-save.
Then re-import the mesh into STRPIX again.
Now it's just a matter of re-texturing the tank and Lara's back to suit
your taste. Such as!
In this case, I used the exported backpack texture to re-color Lara's
back as explained in the "Outfit Tips and Tricks"
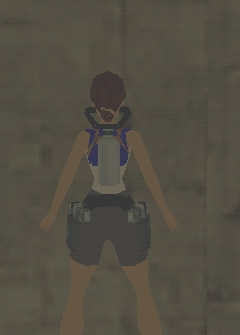
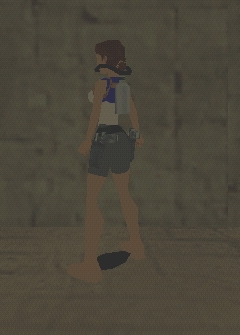
Here's a sneak look at what we've done so far!
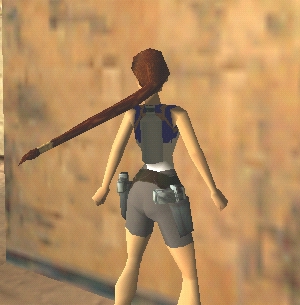
You may notice that Lara's Torso is considerably darker than the rest
of her, Don't worry, we'll fix that later.
Hopefully, this hasn't been too difficult, because the next part is when
its starts getting fun!
Since we already have the STRPIX up and running, scroll back to mesh #8 and export that mesh. Save it as mesh #8.dxf.Then find meshes #31,#46, and #47,these are her heads and neck, Export them.
Now, back to Rhino. Open head mesh (#31) and then import meshes #46, and your newly modified torso mesh. Drag the torso mesh into approximate position. These will be deleted later.
Now would be a good time to fix Lara's hair. Go ahead and import mesh #8 as well, and nudge it to the left six or seven spaces (Alt + Left Arrow). What we're going to do with this is delete everything except the bun and then nudge it back into place.
NOTE: When you get to the point as shown below, you'll have to turn on control points and delete the remainer as groups of points.
Once you get to this point, you'll have to experiment with rotating and scaleing the bun to fit over the pony tail opening. The better the fit you can get, the better your finished project will look. IT IS VERY IMPORTANT THAT YOU DO NOT MOVE THE POSITION OF THE HEAD MESH ITSELF, AS THIS WILL CAUSE THE NECK TO NOT LINE UP!
Now, we're going to build the breathing tubes.
Import mesh #240 and nudge it about twelve sapces to the left and ten to the front (Alt + left arrow and Alt + Down arrow).
First, you'll want to rotate (TRANSFORM>ROTATE ) this mesh 90 degrees so that the low end is facing the back of Lara's head. Do this in the 'RIGHT VIEW WINDOW' This doesn't have to be exact, because it'll have to be adjusted later. Now mirror this from the 'FRONT WINDOW' (TRANSFORM>MIRROR). It should look something like this...
Now, nudge the highlighted portion one or two spaces to the right. (This spacing varies because of the mirror point variations. (In all the times I've done this,one space os the fewest, three is the most)
Highlight both sections and scale them down a bit so they're not so big. As long as they're still highlighted, you can drag them into place around Lara's head to check the fit. Once they clear her head, you can nudge them aside again to finishe building them.
Now that you have the proper spacing, simply draw (TOOLS>POLGON PRIMITIVES>3D FACE), the polys to close it up front and rear. Remeber to draw your polys in a COUNTER-CLOCKWISE direction so their faces are facing out!
Once you're satisfied, nudge it back into place (Highlight it first) and check the fit.
You may also want to add a 'mouth piece'. This can either be drawn in "free Hand" or as I did, import Lara's head again, move it aside and delete everything except the two mouth sections, resize and drag into place on the tubes. Both ways work!
IMPORTANT! Once you have everything like you want it, move the pipes to the side one more time, highlight them and join them in to one mesh (TOOLS>POLYGON MESH>JOIN). This will make the next phase much easier!
Now, move it back into place one final time, check the centering and fit, being certain that nothing is colliding with Lara's head or the tank.
If all is well, delete the neck and torso meshes and save this as headwithpipes.dxf. Open (maximaize) STRPIX, and after you,ve gone back to the head mesh (#31) import this new mesh into your wad. Retexture the pipes (I used text #1225 which is black, but any solid color texture will work) and the bun (Text #'s372 and 240). You'll have to rotate the mesh to see all the faces of the pipes, and zooming in helps a bit too!
To make the final step easier, once you've retexture everything the way you want it, re-export this mesh over the one you just imported (headwithpipes.dxf). What this does, is saves the texture information in the mesh, so you won't have to re-texture the bun and pipes again later.
IT'S ALL DOWN HILL FROM HERE!
Remember, Lara has two faces in the game. The other is mesh #47 in this wad.
Open mesh 47 in rhino, then import your 'headwithpipes.dxf' as well but nudge this one to the side. Remember how many spaces you nudge it!
Delete everything of the head with pipes, except the pipes and the bun. If you accidently delete too many parts, you can easily restore them by going to EDIT>UNDO MULTIPLE. Go ahead, take a look any way!
Now, simply highlight the pipes and bun, and nudge it exactly back into place again on the head mesh (#47). BE CERTAIN THAT THE HEAD MESH IS IN THE ORIGINAL POSITION! Once you've checked the fit, save this as angryheadwithpipes.dxf .
Back to STRPIX, find mesh #47 and import your lates mesh into the wad and VIOLA! instantly textured and modified mesh!
Lastly, go to the meshes page and download the "Tiny Pony Tail package and replace the normal pony tail with these parts. (Meshes 60 through 65).
Save the wad and load it up into your TRLE/graphics/wads folder after you make a backup of the original. Build it with TOMB2PC.exe and you're ready to play with Lara wearing a wetsuit, complete with scuba tank and breathing tubes!

I hope that this project has given you a basic understanding of how to modify Lara's meshes, and a basic understanding of the wonderful Rhino3D program. Quite likely, you can use these same methods with any cad program. As long as you make copies of your originals, and save often, mistakes can be undone, or projects can be started over. Never let the complexity of the program deter you from trying your hand at something as entertaining as this!
Tommy Tomb Raider